Saturday, December 15, 2012

It's a Wee Chilly!

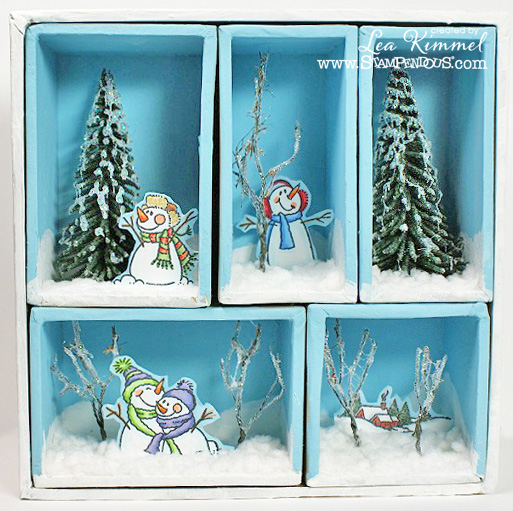
It's just a wee chilly today on my blog!  OMG!  Aren't these little pine trees just the cutest things ever!  And look at those darling little bare trees.  They're just so little and cute and perfect for a winter landscape.  These awesome little trees are from Wee Scapes and we have had so much fun collaborating with them this past week at Stampendous.

This is my little shadow box I've created using a Tim Holtz Configurations box, some craft paint, Wee Scapes and Stampendous goodness!  Here's a breakdown of what I did.  First I painted the boxes with baby blue and white craft paint.  Next I trimmed my trees to fit and using Beacon Adhesives Zip Dry I added Stampendous Multi Ultra Fine Crystal Glitter on all the trees.  I stamped my images, colored them with Copics and cut them out leaving a tab on the bottom that could be folded to help the images stand alone.  I glued my trees in along with my images and then added Cotton Ball White Fun Flock from Stampendous.  It was a little time consuming but so worth it, I love how it looks completed!  I've included a close up of each individual box.


 As I completed each box, I know my smile just got bigger and bigger!  I really love how this turned out!  The stamp sets I used are Winter Trees Perfectly Clear Stamps (PCS) and Snow Place PCS.  

The flock added just the right touch of fluffy whiteness and really gave it a realistic snow drift kinda look!  I love the little house nestled in among the drifts in the bottom, it just looks so cozy.


So, if you want to be eligible to win one of the prizes this week, you must leave a comment on each blog.  Here's the complete list of my teammates playing along today.  Be sure to check them all out and leave some love as you go along.

Jennifer Dove
Jennifer Ingle
Lea Kimmel (Me!)
Melinda Gleissner
Suzanne Czosek
Wendy Price

We've certainly enjoyed playing along with Wee Scapes this past week.  I hope you've enjoyed the inspiration.  Thanks for stopping by and I'll see you again soon!

Hugs,
Lea

P.S.  Please keep the families in Newtown, CT in your prayers and hug your loved ones.


Friday, December 14, 2012

Aloha for Wee Scapes!

Aloha!  Stampendous is doing a collaboration with Wee Scapes, a company that specializes in miniatures.  Tiny trees, itty bitty flowers, even little people, are just a few of the items they make that are perfect for crafting or creating train scapes.  Today, I've created a little project (pun intended!) using their adorable palm trees and some of their tiny little flowers and bushes.  I must admit that when I first heard about the collaboration, I was a wee bit skeptical (more puns!), however, with a little (here I go again!) imagination, you'd be amazed at what you can create!


Here's a couple of shots of each corner:


On this side I used two of the palm trees, a portion of one of the bushes and several flowers.


On this side I used one palm tree, the remaining section of the bush and several more flowers.


Here's what I've done, first I bought a small unfinished wood shadow-style box.  Using Tim Holtz Distress Stain in Picket Fence, I "painted" all four exterior sides.  I did about three coats on each side of the stain.  Using my Boss Gloss from Stampendous, I coated the inside of the box one side at a time.  I coated the top, left and right interior sides of the box with Periwinkle Opaque Embossing Powder.  For the interior back, I used the Periwinkle EP and while holding the heat gun over, I lifted it off just long enough to sprinkle White Opaque Embossing Powder over the blue.  I repeated this process several times until I achieved my fluffy clouds that I liked.  I attempted to create a wave behind my cute little hula kiddo but it just didn't look right so I abandoned the effort!  For the interior bottom I used Golden Sand Embossing Powder.  Using Beacon Adhesives Zip Dry and Gem-Tac, I attached the trees, bushes and flowers.  Once those were dry, I added my Hula Kiddo that I had already colored and cut out.  Using one of my Action Wobbles, I attached her to the back of the box so she looks cute and wobbles, too!  I used a few shells from Pensacola Beach, FL to line her path.  For the outer edge of the box, I used some rough twine and put two rounds of that all the way around, knotted the corner, glued the ends down and added a shell on each corner.  So there you have it!

Be sure to comment on my blog and April Derrick's blog for a chance to win some of these great little pieces of scenery and some Stampendous stamps. If you don't have model builders in your life, head to the Store Locator on the Simi Creative website for where to buy Wee Scapes in your area!

Thanks bunches for stopping by and I'll see you again soon.

Hugs,
Lea

Thursday, December 13, 2012

Happy Birthday, Laura!

Happy birthday to you!
Happy birthday, dearest Laura!
Happy birthday to you!

And many, many more...

For those of you that don't know, Laura Weed's birthday is today!  Laura wears several hats at Stampendous but I think her favorite is Design Team Wrangler!  She keeps us busy creating projects to share with you guys and gals.  She also manages to hook us up with blog collaborations from some of the best companies in the industry.  She is amazing and I don't know how she manages to do all she does on a daily basis while still making our team feel loved and nurtured by her and all of Stampendous.  She is the glue that holds our glitter!  Laura, I love you and I hope you have a wonderful birthday!

Here's a card I created for Laura using Cling Jumbo Dahlia and Cling Jumbo Butterfly Trio.  My papers are Bazzill, Neenah and Bo Bunny.  Both images were colored with Copics, however, I did stamp the flower with Memento Desert Sand to minimize visual lines.  That gorgeous ribbon is from May Arts.  I also used a little copper wire for the butterfly's antenna.  Both images were pop-dotted on.


So, Laura, I hope you like your special card!  More than anything, I hope you enjoy your special day and  have a wonderful year ahead.  Here's the complete hop list for Laura's Birthday Hop:

Lea Kimmel (Me!)
Melinda Gleissner

I would like to thank Melinda Gleissner, my fellow Design Team member, for organizing this hop for Laura.  Melinda, you're awesome!  Thanks for stopping by and I'll see you again tomorrow with a special project!

Hugs,
Lea

Wednesday, December 12, 2012

A Bowl Full of Lemons Giveaway


A Bowl Full of LemonsIf you haven't found A Bowl Full of Lemons, you're missing out!  Today Toni Hammersley, organizing guru,  is giving away an awesome purse by Grace Adele!  I don't normally post about these things but I'm making an exception because her blog is amazing!  Here's the link to her blog and giveaway:


http://www.abowlfulloflemons.net/2012/12/giveaway-time-grace-adele.html#comment-36979


This is THE purse!  Yep, this is the one she's giving away!  So, whether you want to enter the giveaway or not, go check out her awesome blog.  And, her Pinterest boards are absolutely fantastic so be sure to check her out there as well!  http://pinterest.com/toni_hammersley/  

My daughter turned me on to Toni and A Bowl Full of Lemons and I've been addicted since!  Enjoy!

Hugs,
Lea

Thursday, December 6, 2012

Make Mine Metallic!

I don't usually use gold and silver together in this fashion but when the team at Do You Stack Up Challenge Blog (DYSU) put the Silver and Gold challenge out, I answered their call! Stampendous sent them some of our Aged Silver and Aged Gold Embossing Enamels to play with, now I can't wait to see what they do with it! Playing from our Design Team are:
Lea Kimmel - (me!)


Okay, so I will be the first to admit that I didn't use Aged Silver or Aged Gold, instead, I chose to use Detail Silver EP and Detail Gold EP.  They just seem to flatter my chosen images more than the aged would have.  I'm posting four pictures of my card because the angle of the card makes all the difference when using silver and gold powders.  Notice how the house changes from silver to dark gray in the two pics on top?  It's all in the angles when working with metallics!

Also, if you saw my previous post, you know that the Stampendous Monthly Challenge is Clean and Simple (CAS) Christmas Cards.  I'm using this card for that challenge as well and I do hope you will feel inspired to play along!  I've added our awesome link button below to make things easy for you!

So, there you have it!  Two fun challenges and two fun opportunities to win prizes!  What more could you ask for!?

To make this card I used Bazzill for the top-fold base and added some papers from Recollections Sugar Plum 6x6 paper pad.  The images are Scripty Blessings and Snowy Postcard, both from Stampendous.    My images were stamped on Neenah paper using Boss Gloss for the ink.  I trimmed the images and used Tim Holtz Distress Ink in antique linen and tea dye to "age" them.  That beautiful two-toned ribbon is from May Arts.

Thanks bunches for playing along and I hope to see you again soon!  Thanks for stopping by!


Hugs,
Lea


Monday, December 3, 2012

It's a Stampendous Clean And Simple Christmas!

Our Stampendous challenge to you this December is to make a Clean and Simple Christmas Card and enter it in our contest (of COURSE we’ll accept your other card-sending, December holidays!!) All you need to do is create a CAS card and click on the Cattus Librum link below or on the Stampendous blog on the right sidebar and add the link to your card or cards. They’ll even count double if you use Stampendous image stamps! (yes, we know your favorite “Merry Christmas” is Stampendous… but we want you to use our images, too!)  So here is my first card for this challenge and it doesn't get much easier than this:


I used red Bazzill for my card base making a top fold A-2 base.  I did a layer of patterned paper from DCWV Four Seasons Stack adding a length of May Arts ribbon I knotted on the right side of the card front.  I stamped my Jumbo Cling Poinsettia (get it at Michael's) with Memento Tuxedo Black, colored it with Copics and cut it out.  I used a jump ring to attach the Tim Holtz Idea-ology word stick that says "Wish."  Seriously clean and simple look that took no time to put together!

I hope you enjoy my card.  Thanks for stopping by and I'll see you again soon!

Hugs,
Lea


Saturday, December 1, 2012

3 Ring Circles in a 3 Ring Circus

Yes, my life often feels like a 3 ring circus between kids, work, teaching classes and all the daily business of living.  Crafting keeps me calm and allows me to de-stress while letting my creativity flow whether it's creating a bangle, pair of earrings, card, or, in today's case, a wreath!  I can't even begin to tell you how much fun I've had with this week's collaboration between Stampendous and DIY Bangles!  I used a wreath form from DIY Bangles line of "3 Ring Circles."  This project was especially fun to do as I enjoy creating wreathes.  Admittedly, I don't usually get to combine a wreath with stamps but I did and I like the combination!  I started out with the 3 Ring Circles 12" Floral and Craft Wreath ring.  I wrapped approximately 7 yards of green ribbon around the ring completely covering the bare wood.  I could have just painted it but I had something else in mind and I often go with the flow of creativity.  Next I added strips or white tulle by just looping each piece on.  I have this really cool sparkly May Arts ribbon that I wrapped around leaving  it loose giving it an almost floating look.  For the final touch I added three Jumbo Cling Poinsettias that I stamped with Memento Tuxedo Black, colored with Copics and cut out.  This stamp can be found at Michael's. I attached them to the wreath with pop-dots.  It's a very simple wreath but I'm a simple kinda gal!


Here's a close-up of the poinsettias:


I hope you get some time out from your 3 ring circus to do some crafting, maybe even with some 3 Ring Circles! There are several different sizes and widths to choose from but no matter which one you pick, you're sure to love it!  A lot of the design team ladies are playing along today and we've each created a project we hope will inspire you to create your own.  For now, how about a hop?  At each blog (or just the ones you want) leave an insightful comment that lets us know you actually looked at the project and we'll enter you once for each comment in a chance to win some DIY Bangles, beads, or circles plus some Stampendous goodies with which to embellish them.  Now who wouldn't want to win one of those prizes?  Stampendous goodies are always the best kind of goodies!!


We sure hope you've had some serious fun with our collaboration this week! Thanks for joining us. Would you mind sharing our hop on your Facebook page? We'd sure love to grow our audience a bit more to be able to keep bringing you all these great prizes.

Join us as well for our new December Challenge - CAS (Clean and Simple) Christmas Cards. We'll be doing our best to give you last minute card ideas you can complete quickly to fill out your card sending list. We'll be providing simple Christmas card inspiration all the way up until Christmas day, so stick with us. This will be our last challenge of the year and we're mulling over what to do next year, so stay tuned for that as well!

Stick around and we'll announce November Prize winners and the Winners from this hop early next week (once the staff has recovered from their Warehouse Sale and Holiday Party this weekend!).  Thanks for stopping by today and I'll see you again really soon!

Hugs,
Lea